AlarmK User Guide
From install and permissions to creating alarms, the eight missions, Critical Mode, the Wake Report, widgets and Siri, and troubleshooting — a step-by-step walkthrough. Written for AlarmK 1.6.0. Screens and behaviour may differ in later versions.
Your first QR alarm: three steps
Free · No ads · No account · iPhone / iOS 26 or later
- Install and allow system alarms. Get it free on the App Store. Allow System alarm (AlarmKit) on first launch. If you declined, open Alarm readiness at the top of the app's Settings tab to reach iOS Settings.
- Choose one QR mission and practise. Tap + in the Alarm tab. Under Wake mission, tap Add mission, open QR/Barcode Scan and tap Register code. Print or save the QR and place it away from bed, such as in the bathroom, then tap Add and allow camera access when asked. A new alarm starts with a math mission; to keep only the QR, remove math with −. Use Try this mission to check the scan.
- Save your first alarm and verify the time. Choose your time and repeat days, then Save. Check that the alarm is enabled and verify its next ring time in the list. For important plans, set a backup in the Clock app yourself.
Prefer something else? Choose another of the eight missions, such as math. Start with one mission.
First, know this — an alarm is an aid, not a certainty. AlarmK is built to reduce the situations where an alarm can't ring, but it can't prevent physical failures: a powered-off phone, a drained battery, a denied permission. No alarm app can. For anything that really matters, set a backup alarm in the system Clock app too.
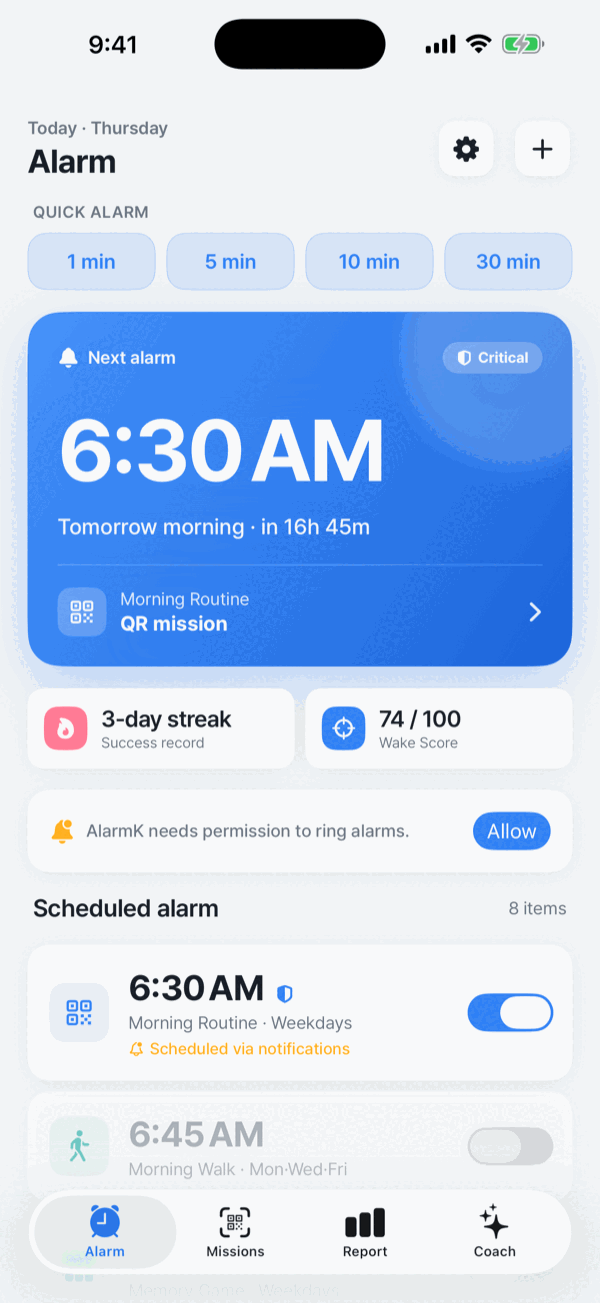
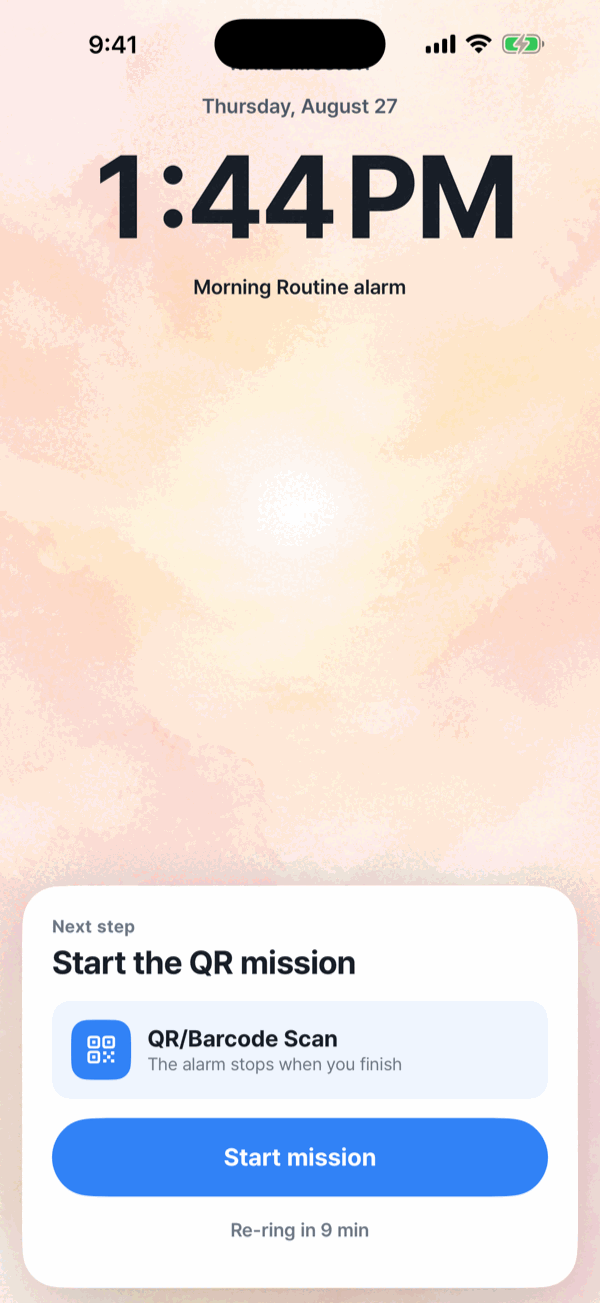
The home screen and the waking moment
01Getting started — install & permissions
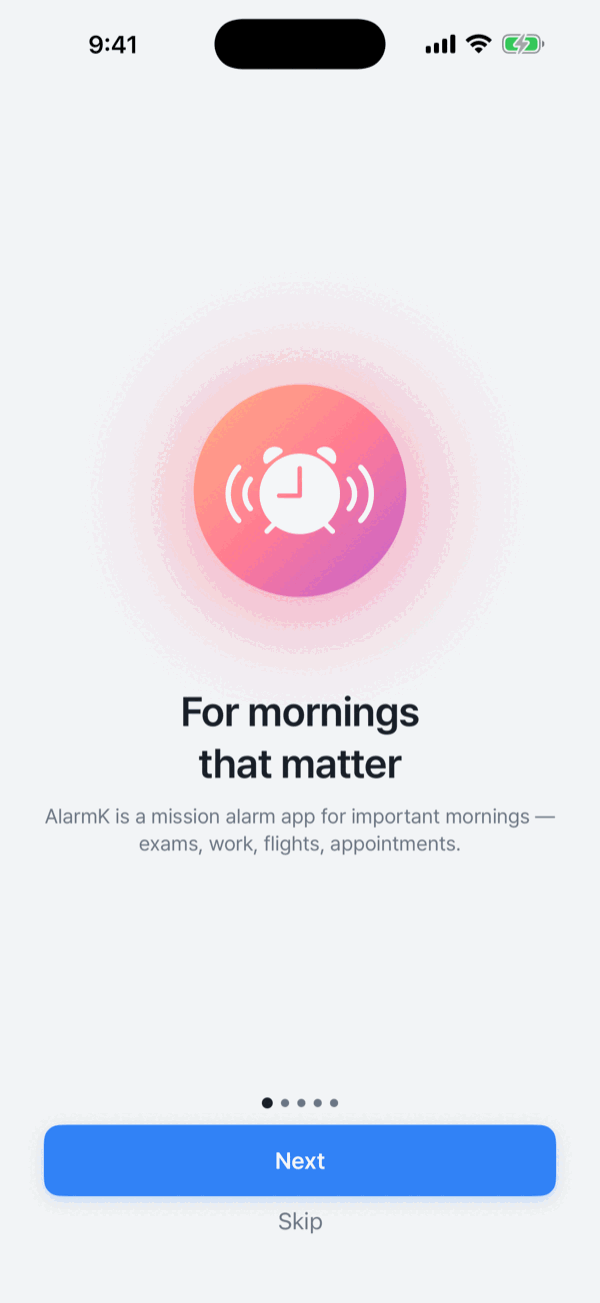
What you need: an iPhone on iOS 26 or later
AlarmK is built on AlarmKit, the system alarm API Apple introduced in iOS 26. That's why iOS 26 or later is required.
On iOS 18 and earlier there is no AlarmKit, so older AlarmK versions use ordinary notifications — and with the ringer switch on Silent, a plain notification has no way to make a sound. Rather than ship an alarm that might stay quiet, we don't support those versions. If you already installed AlarmK on iOS 18 or earlier, App Store policy lets you keep using the last compatible version (1.2.0).
Install
- Open the App Store on your iPhone.
- Search for AlarmK, or open this link and tap Get. Open AlarmK on the App Store
- On first launch a short onboarding walks you through the permissions.
The two permissions
- System alarm (AlarmKit) — allow it to schedule system alarms: through Silent mode and through Focus, full screen on the Lock Screen.
- Notifications — allow it and you can add AlarmK to the allowed-apps list in Settings › Focus. It may be the fallback for existing alarms scheduled before system alarm permission was denied.
In 1.6.0, you cannot save or enable new alarms without System alarm (AlarmKit) permission. Existing alarms scheduled before permission was denied may fall back to notifications if those are allowed. Look for “Delivered as a notification” on the alarm in the list. This path is affected by Silent and Focus; if both permissions are denied, it cannot ring.
You can check both later in Alarm readiness at the top of the Settings tab, which links straight into iOS Settings to turn them back on.
Camera (QR/barcode and Find an object missions) and Motion & Fitness (walk mission) are requested when you add a mission that uses them, or at the latest when you save the alarm — never while an alarm is ringing. If one of them is off when you save, the app warns you that the mission can't start in the morning, with Open Settings, Show mission and Save anyway. Settings › Permissions shows the state of both.
02Create your first alarm
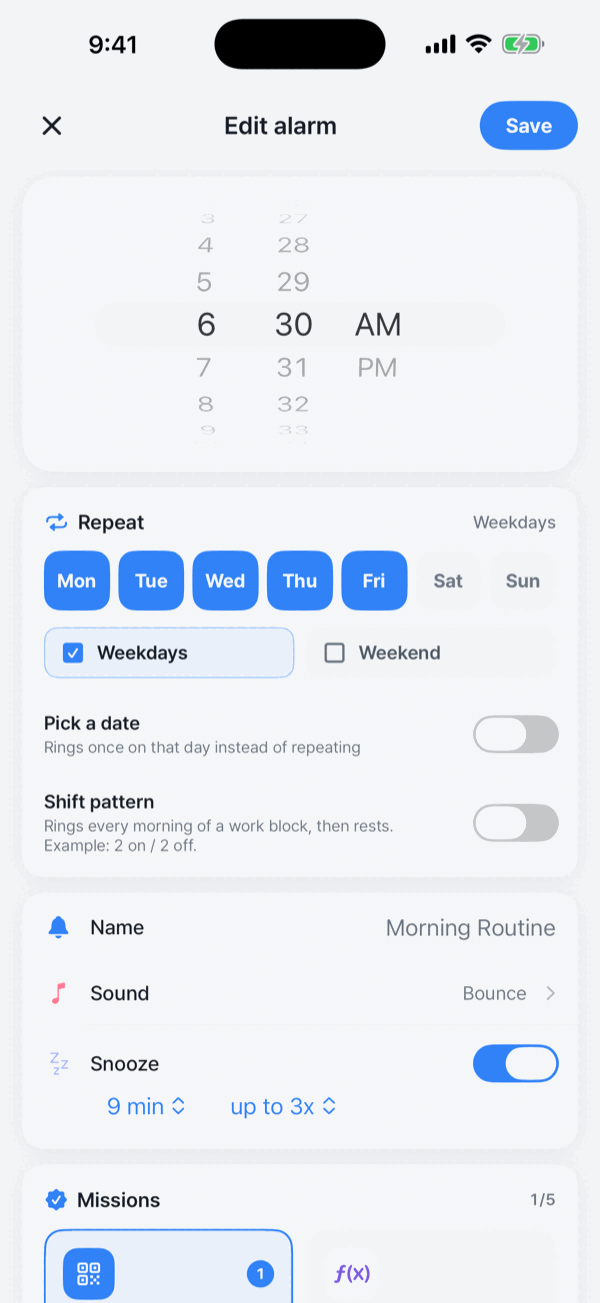
Tap + at the top right of the Alarm tab.
- Pick the time.
- Choose how it repeats (three options below).
- Set the wake mission (see section 03). A new alarm starts with a math mission; you can change it, add more, or remove it and leave the alarm without one.
- Set a name, a sound, a background and snooze. There are 32 sounds, grouped by mood. The background is a photo shown behind the ringing screen and your missions (17 photos, plus the default dawn); the Lock Screen alarm is drawn by iOS and stays the same.
- Save. The alarm joins the list with a countdown to when it next rings.
Three ways to repeat
- Weekday — pick any days from Monday to Sunday, or use the Weekdays / Weekend presets.
- A specific date — for an exam, a flight, an appointment. It rings once on that day. Choose local time (follows the clock wherever you are) or fixed instant (pins the absolute moment, e.g. a boarding time).
- Shift pattern — set something like “2 days on / 2 days off” and it rings every morning of a work block, then rests. The cycle is anchored to the first day of the block.
Skip public holidays
Alarms on a weekday repeat can skip public holidays. The table of Korean statutory holidays (substitute days included) through 2028 ships inside the app, so no network call is made. Outside those years the alarm rings normally.
It doesn't apply to shift-pattern or dated alarms, and Critical Mode alarms always ring, holiday or not.
From the list
- Toggle an alarm on or off; tap it to edit.
- Long-press to skip just the next occurrence (and to undo that), duplicate, or delete.
- Use the quick alarms at the top of the home screen (1 · 5 · 10 · 30 min) for naps and timers.
03Missions — eight types, and mission chains
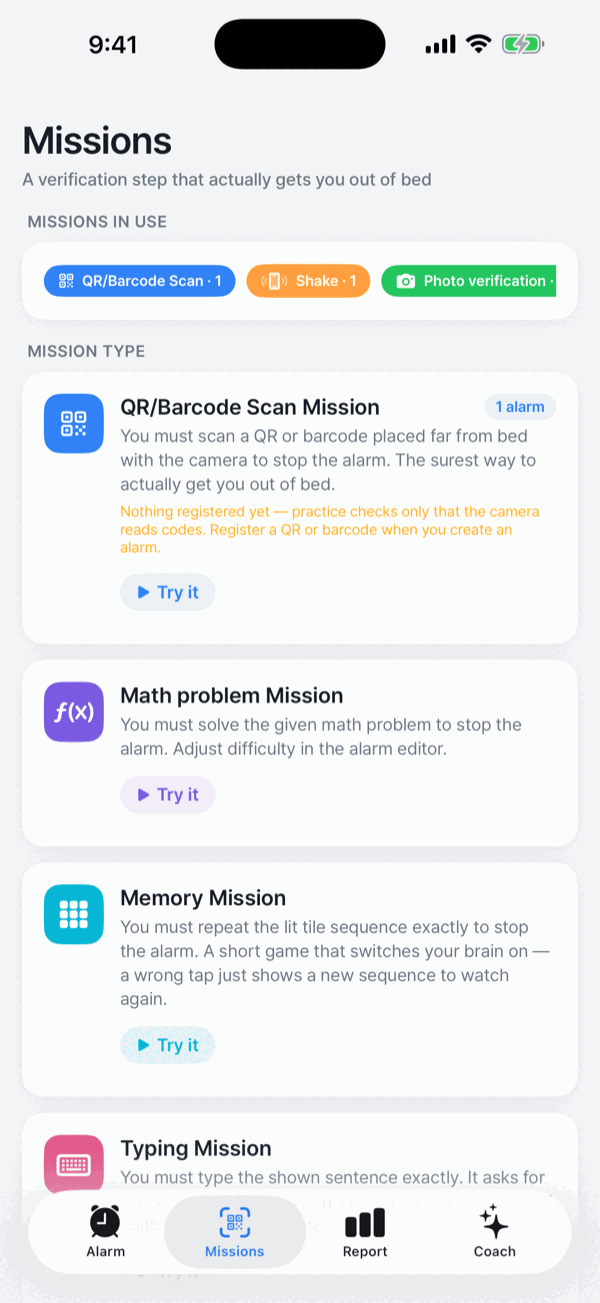
A mission is what you have to do before the alarm will stop. It stops you dismissing the alarm with your eyes closed and gets you physically moving. Every alarm can have its own.
The Missions tab lists the eight in three groups: Gets you out of bed (QR/barcode scan, find an object, walk), Wakes up your body (shake, squat) and Wakes up your mind (math problem, memory, typing). Tap one to see what you'll do in the morning, the workload at each difficulty spelled out (for example “3 problems · two-digit + and −”), and Try this mission.
The eight missions
- QR/barcode scan — scan a code you've put somewhere far from the bed. A mission you can start away from bed.
- Math problem — solve the problem you're given.
- Memory — repeat the sequence of lit tiles. Get it wrong and it simply shows a new sequence; there's no penalty. Lost track of it? Watch again shows a new sequence to remember.
- Typing — type the sentence shown. Case and repeated spaces are ignored.
- Shake — shake the phone a set number of times.
- Squat — do a set number of squats. It detects the pause at the bottom, so just going through the motions doesn't count.
- Walk — take a set number of steps. Only steps after the mission starts are counted.
- Find an object — register the fixtures you actually have from a short list: toilet, washing machine, kitchen sink, bathroom faucet, microwave, refrigerator, TV. Registering takes one test photo, and only objects recognised in your own home are added. When the alarm rings it picks one (Easy), two (Normal) or three (Hard) of them at random and asks for each in turn. If one is out of reach you can swap it for another registered object. Photos are judged on the iPhone, used only for the check and never stored, and the registered list stays on that device. You need at least one registered object before you can add this mission to an alarm. An older alarm that already uses it with nothing registered keeps working with a single photo of anything.
Choose Easy, Normal or Hard for each mission except the QR/barcode scan, which only asks for your registered code. Math and memory add an Expert level.
Mission chains — up to five per alarm
You can chain up to five missions on one alarm. You do them in the numbered order, and the alarm keeps ringing until the last one is done.
- In the alarm editor, tap Add mission. Tap + next to a mission to add it at Normal difficulty, or tap the mission itself to choose its difficulty first. Added missions show their order and workload, and tapping the check mark takes one out again.
- To change the order, tap Edit order. To remove a mission, tap − at the end of its row and confirm.
Try this mission (practice mode)
Every mission's page in the Missions tab has a Try this mission button, and the alarm editor has Try this mission or, with more than one, Try this sequence. No alarm rings, and nothing is added to your wake history. Use it to check that your printed QR actually scans, before the morning that matters.
Registering a QR or barcode
- In the alarm editor, tap Add mission, open QR/Barcode Scan and tap Register code. Use the code AlarmK generates, or register a barcode you already own — a milk carton, a book's ISBN, a delivery box. The mission can't be added until a code is registered.
- If you used the generated code, print or save it and put it far from your bed.
- When the alarm rings, walk over and scan it.
Recommended spots: the bathroom mirror (it's on your way to washing your face), the coffee machine (it ties into the first routine of the day), or the inside of the front door.
The code's secret syncs end-to-end encrypted through your iCloud Keychain. Move to a new iPhone and the printout you already have still works; turn iCloud Keychain off and it stays on this device only. Verification happens entirely on-device — the value never reaches our servers. Paper wears out, so print a spare.
When you genuinely can't do the mission — Emergency stop
Use Emergency stop if the camera is broken or you cannot reach the registered code. In 1.6.0, follow these steps:
- Wait 30 seconds. The alarm continues during the wait.
- Finish both backup stages. For a QR or other non-math primary mission, complete five math problems, then 50 shakes. If the primary mission is math, complete 50 shakes, then a memory task. Finishing only the first stage does not end the alarm.
- If those tasks cannot be done either, choose the last-resort route. It requires an additional 60-second wait and 30 confirmation taps.
Either route is recorded as an emergency stop rather than a completed mission. Turn off Allow emergency stop in the alarm editor to hide the normal mission-screen shortcut. It still appears when a mission cannot start, such as when camera access is off.
04When the alarm rings
- When an existing alarm scheduled before permission denial is delivered as a notification, a card sits on your Lock Screen before it even rings. It appears the moment you set the alarm and stays until it rings, so the Turn off button is still reachable after the banner has gone. With the system alarm permission on, iOS shows its own full-screen alert and the card isn't needed.
- When it rings, the alarm takes over the Lock Screen full screen. With the system alarm permission allowed it rings through Silent mode and Focus.
- Tap Start mission to go straight to the mission. The alarm ends when every mission you set is done.
- The Dynamic Island and the Lock Screen Live Activity carry the countdown before the alarm, the ringing state, and then the mission's progress.
- Snooze follows the interval and limit you set on that alarm.
- An alarm with no mission keeps coming back until you turn it off too — it isn't a single chime. The repeats run for the re-ring duration in Settings › Wake behavior (15 minutes by default).
- While an alarm is ringing there are no ads, no subscription prompts, and no rating requests.
05Critical Mode
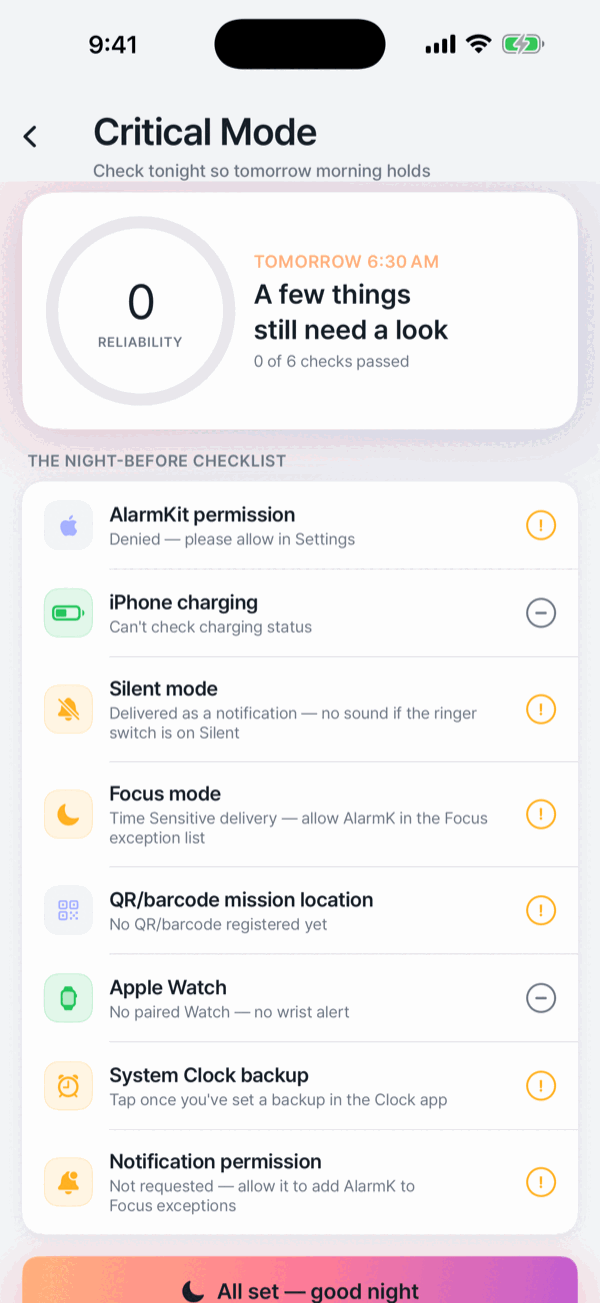
For the mornings that can't fail: a first day at work, a flight, an interview. Turn it on from the alarm's edit screen. It costs nothing extra.
- The night before, switch on Critical Mode for that alarm and open the checklist.
- The app checks system alarm and notification permissions, battery and charging, QR/barcode registration, and Apple Watch pairing. The Silent and Focus rows explain the delivery path; they do not read the switch or actual Focus state. It cannot check physical QR placement. Set a Clock backup yourself, then mark it as checked.
- Each row is marked passed, needs attention, or can't be checked. The reliability score counts how many of the checkable items passed — anything it can't verify is never counted as a pass, and isn't counted in the score at all.
- Critical Mode includes a preparation reminder the night before (9 pm by default; change or turn it off with Prep reminder in Settings › Night before) and advance alarms. By default, advance alarms sound 30 and 10 minutes early; you can turn them off or choose only 10 minutes with Early alerts in Settings › Wake behavior. Skip public holidays does not apply.
Even at a high score, set a backup alarm. The checklist only sees what the app can see. On a morning that really matters, also set an alarm in the Clock app, and tap the last checklist row to record that you did. And if you do miss a morning, the app won't blame you — it turns it into something to change tomorrow.
06Wake Report & Coach
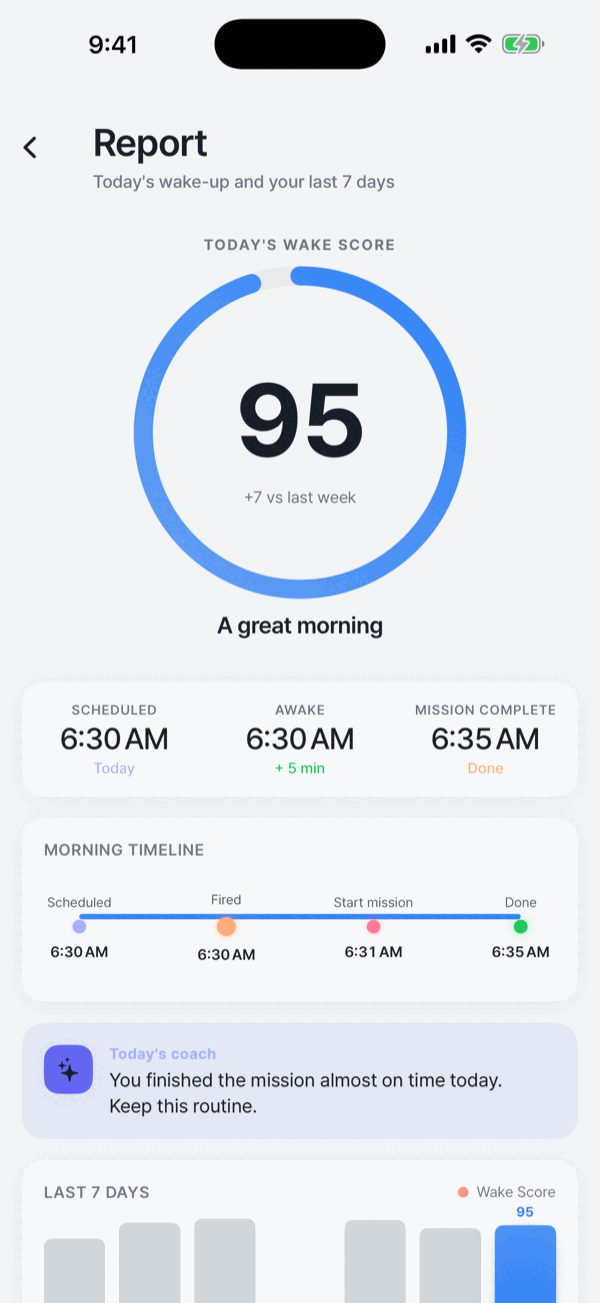
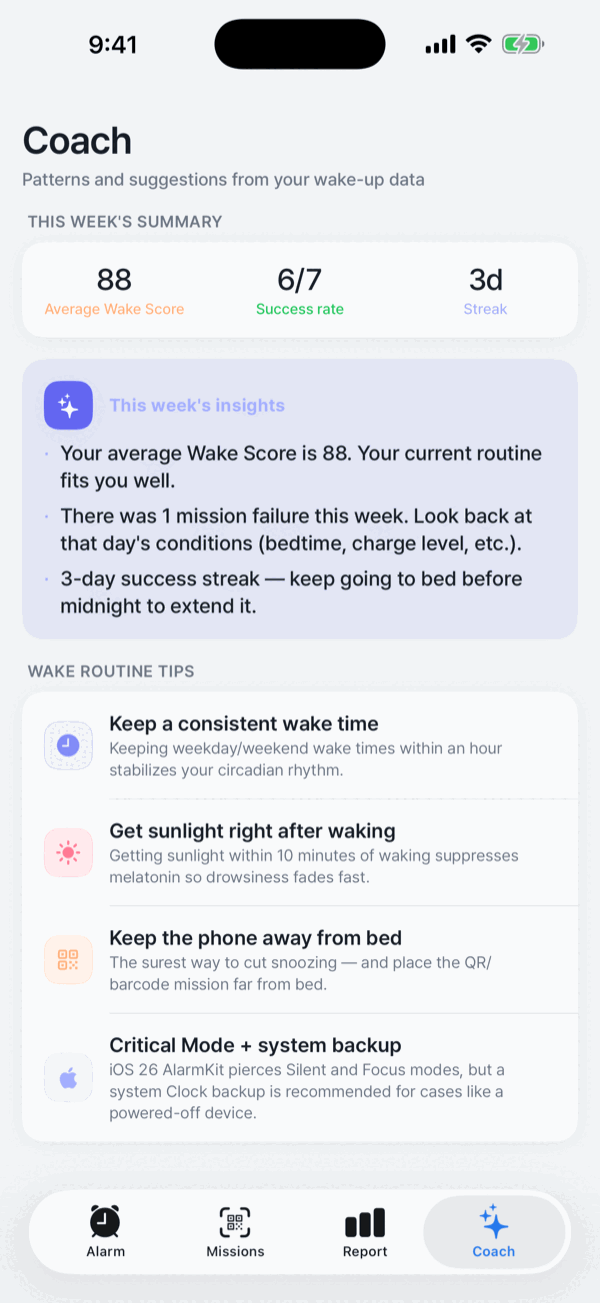
The Report tab and the Coach tab
- Report tab — the time the alarm rang and your mission start and finish times are recorded automatically and turned into a Wake Score. You can see the last seven days as a trend, that morning's timeline, your snooze count, and how late you were against the scheduled time.
- Coach tab — this week's average score, success rate and streak, plus short insights drawn from the pattern in your own records, and a few wake-routine tips.
- The success streak is counted over your whole history, not just the seven-day window.
- Everything is processed on your device. None of it is sent to our servers.
07Settings that guard the night and the morning
Open the Settings tab at the bottom of the screen.
Settings › Wake behavior · Night before
- Gentle wake — the in-app sound rises gradually over the time you set (30s by default). The very first system alarm sound is played by iOS, so the fade-in doesn't apply to it.
- Ringing escalation — if there's no response about 40 seconds in, the app restores full volume and strengthens vibration (on by default). It only touches the app's own audio; it never works around an iOS setting.
- Re-ring duration — how long the alarm keeps coming back until the mission is done.
- Wake check — rings once more 5–30 minutes after you finish the mission, in case you went back to sleep (off by default).
- Early alerts — how far ahead Critical Mode alarms also ring (30 and 10 minutes by default, 10 minutes only, or off).
- Bedtime reminder (Night before) — counts back from your next alarm by your sleep goal and sends a quiet nudge (off by default).
- Prep reminder (Night before) — the Critical Mode reminder the night before, at 9 pm by default; choose another time or turn it off.
- Lock screen card (Night before) — puts a card on the Lock Screen from the moment you set the alarm until it rings. It only matters on the notification path, so the toggle is greyed out — with the reason shown — when the system alarm permission is on or Live Activities are off.
Settings › Alarm readiness
The card at the top of Settings counts how many of four safety layers are on. Tap one that isn't ready to fix it.
- System alarm (AlarmKit) and Notifications — each permission's state, with a link into iOS Settings to turn it back on.
- iCloud sync — alarms and mission setup sync to your own iCloud, so they restore if you reinstall.
- Block deletion — uses Screen Time to hide the Delete option on the Home Screen while an alarm is ringing. It's one layer against a sleepy finger, not an absolute block — you can switch it off in Screen Time at any time. Turning it on asks for Screen Time access once.
Settings › New alarm defaults · Appearance · Permissions · About · Data
- New alarm defaults — the sound and background new alarms start with. Alarms you already made keep their own.
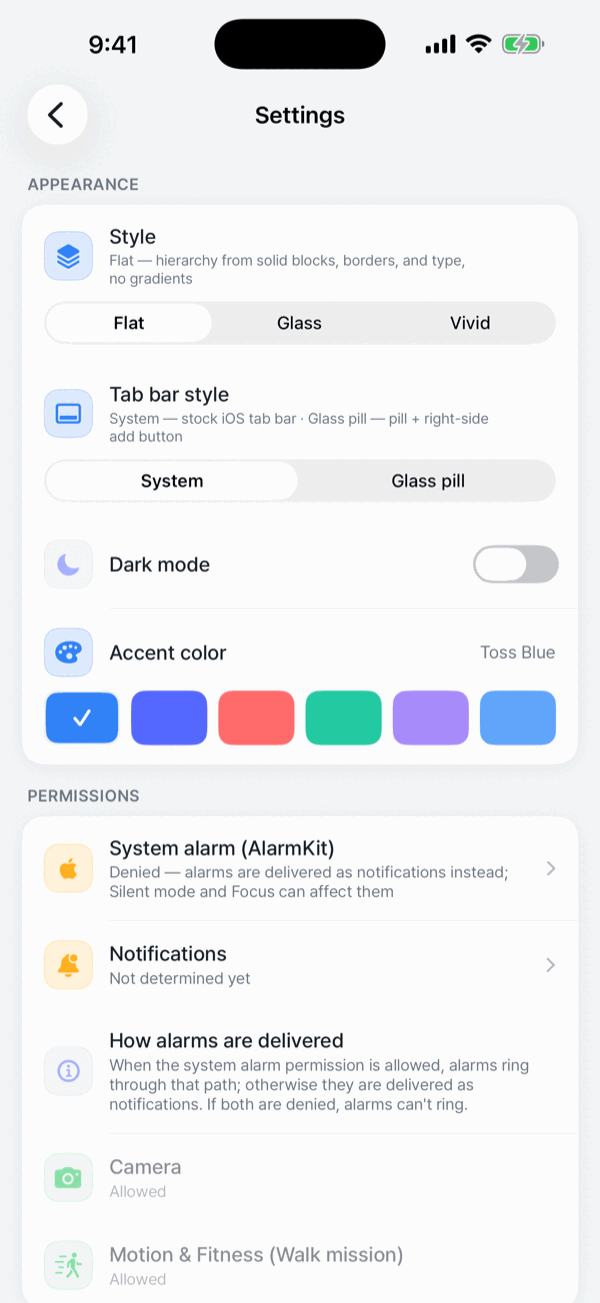
- Appearance — Flat / Glass / Vivid styles, accent colour, screen mode (System, Light or Dark), and tab bar style (System, or Glass pill, which moves Report to a button at the top of the Alarm tab).
- Permissions — how alarms are delivered, and the Camera and Motion & Fitness permissions that some missions need.
- About — version, rate on the App Store, send feedback, an honest note on reliability limits, the privacy policy, open source licences.
- Data › Erase data — removes every alarm, mission, wake record and QR secret, and cancels scheduled alarms. The iCloud copies go too, so they disappear from your other devices. This can't be undone.
08Widgets · Siri · Apple ecosystem
- Widgets — Home Screen and Lock Screen widgets show your next alarm and a countdown, with three Lock Screen widget types.
- Siri & Shortcuts — set an alarm, ask about the next one, start a nap alarm, or skip the next occurrence, all without opening the app.
- Live Activity & Dynamic Island — the countdown before the alarm, the ringing state and the mission's progress run in sequence, and the secondary button drops you into the mission.
- Apple Watch — iPhone alarms mirror to your wrist under the system's own rules, and the alarm Live Activity appears in the Watch Smart Stack. But AlarmKit doesn't support watchOS yet, so there is no standalone Watch alarm and the mission has to be finished on the iPhone.
09Price
- System alarms (AlarmKit) with a notification fallback
- Eight missions · up to five per alarm · practice mode
- Critical Mode checklist and reliability score
- Wake Report and Coach
- Widgets · Siri & Shortcuts · Live Activity
- Shift patterns · holiday skip · dated alarms
- iCloud sync
No subscription, no in-app purchase, no ads. No account to create either. Everything above is free. If a paid tier ever arrives, this page will say so first.
10Troubleshooting
Why didn't my alarm ring?
- Open Alarm readiness at the top of the app's Settings tab and check System alarm (AlarmKit) and Notifications. If both are denied, nothing can ring the alarm.
- Check that the alarm is switched on in the list, and that “Skip the next one” isn't set on it.
- If it repeats by weekday, Skip public holidays may have skipped it that day.
- Check the battery and power state before you sleep. A phone that's off can't ring any alarm.
- On an important day, run the Critical Mode checklist the night before and set a Clock app backup.
Why did the alarm appear but make no sound?
- If the alarm is marked “Delivered as a notification” in the list, the system alarm permission is off and it was delivered as a notification — a path that is affected by the ringer switch. Turning the system alarm back on from Settings › Alarm readiness is the reliable fix.
- If Sounds is off under iOS Settings › Notifications › AlarmK, notification-path alarms arrive silently. The app's home screen flags this state.
- If you use Focus, add AlarmK to the allowed apps in iOS Settings › Focus. (The system alarm path rings through Focus regardless.)
What if the QR or barcode won't scan?
- Check the camera permission and the light on the code. There's a torch button on the scanner screen.
- Point it at a different code and you'll see “Code doesn't match”. Tap Try again and it scans straight away.
- Lost or damaged the code? Open the alarm, tap the QR mission and tap Change to register a new one.
- Before a morning that matters, use Try this mission to confirm your printout can actually be scanned.
What if I can't complete the mission?
Use Emergency stop on the mission screen. After 30 seconds, finish five math problems and 50 shakes (or shake and memory if the primary mission is math). If that is impossible, the last resort requires another 60 seconds and 30 confirmation taps. See the full procedure for recording and shortcut visibility.
Can I use AlarmK on iOS 18 or earlier?
AlarmKit arrived in iOS 26. Current AlarmK releases require iOS 26 or later for system alarms. Older AlarmK versions use ordinary notifications, which are affected by Silent mode. If you already installed AlarmK, App Store policy lets you keep the last compatible version (1.2.0).
11Contact
If something isn't solved here, or you have a suggestion, please get in touch. Using Settings › About › Send feedback inside the app attaches diagnostics — app version, iOS version, permission states — which makes the cause much easier to find.
Email: hello@alarmk.com